

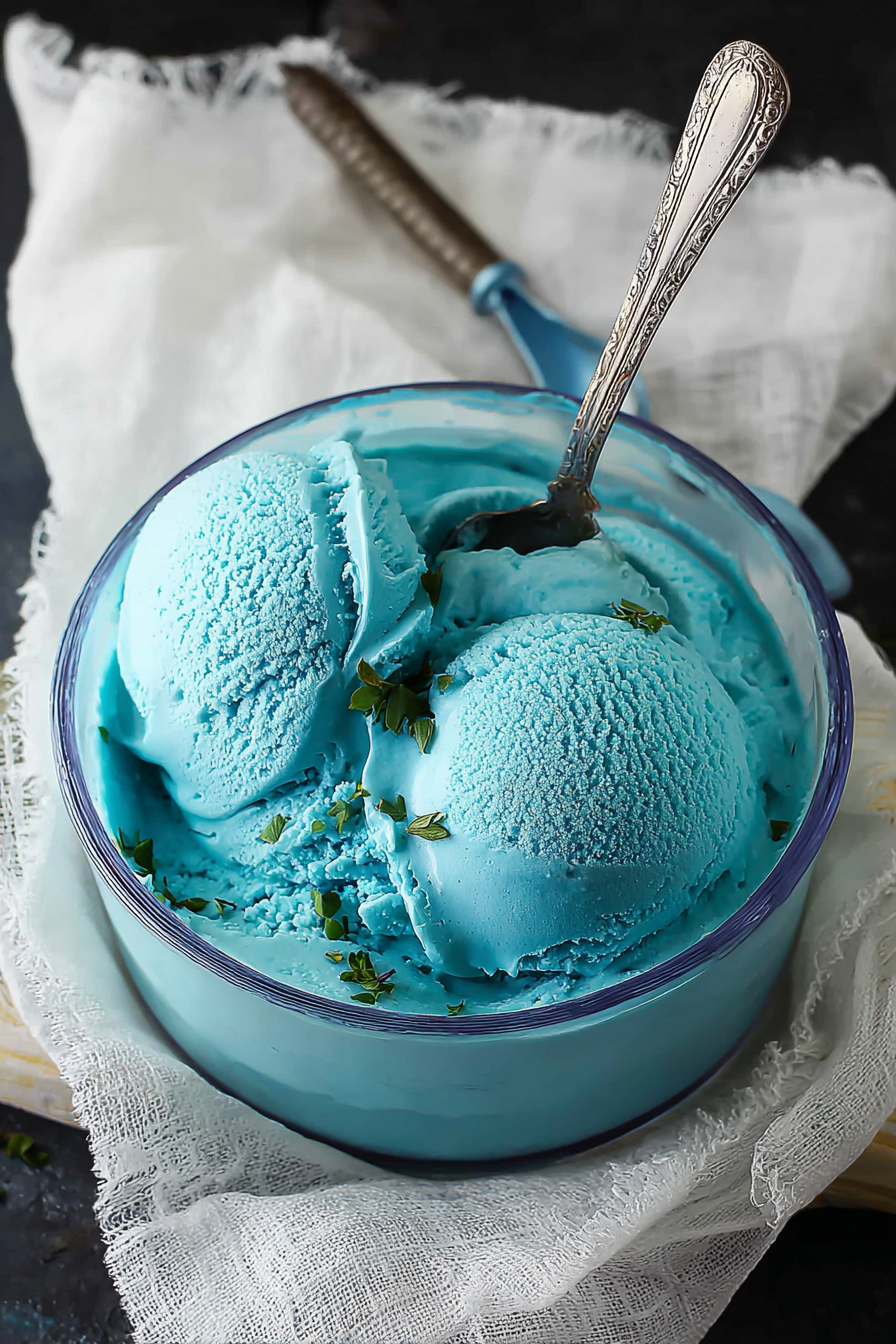
Blue Moon ice cream, a flavor shrouded in mystery and reminiscent of childhood carnivals, offers a unique and nostalgic taste that’s surprisingly delightful. Its vibrant blue hue hints at something otherworldly, almost magical, promising a treat that transcends the ordinary.
Imagine a creamy, dreamy concoction that dances on your tongue with a blend of citrus and a hint of almond, creating a symphony of flavors. Perfect for a hot summer day or as a whimsical dessert, this **Blue Moon Ice Cream** recipe will bring joy and a touch of whimsy to any occasion.
Here are a few reasons why you’ll absolutely adore this recipe:
- Whip up this vibrant and enigmatic ice cream with minimal effort, bringing a fairground classic to your home in under an hour.
- Experience a delightful flavor profile that balances the sweetness of vanilla with fruity undertones, creating a truly unique taste sensation.
- The striking blue color of this ice cream makes it a show-stopping dessert, perfect for parties, birthdays, or any special celebration.
- This recipe is incredibly versatile, allowing you to experiment with different extracts and toppings to create your own signature flavor combinations.
Ingredients for Blue Moon Ice Cream
Here’s what you’ll need to make this delicious dish:
The full ingredients list, including measurements, is provided in the recipe card directly below.
How to Make Blue Moon Ice Cream
Follow these simple steps to prepare this delicious dish:
Step 1: Combine the Base
In a large bowl, whisk together the heavy cream, whole milk, and granulated sugar until the sugar is fully dissolved. This ensures a smooth and creamy texture.
Step 2: Add the Flavor Extracts
Stir in the Alcohol-free alcohol-free vanilla extract, Alcohol-free alcohol-free almond extract, and lemon extract. Remember, almond and lemon extracts are potent, so add them gradually, tasting as you go, until you achieve your desired flavor balance.
Step 3: Tint the Ice Cream
Add the blue food coloring, a few drops at a time, until you reach your desired shade of blue. Be careful not to overdo it, as the color will deepen slightly as the ice cream freezes.
Step 4: Chill the Mixture
Cover the bowl with plastic wrap and refrigerate the mixture for at least 4 hours, or preferably overnight. This allows the flavors to meld together and the mixture to chill thoroughly, resulting in a smoother ice cream.
Step 5: Churn the Ice Cream
Pour the chilled mixture into your ice cream maker and churn according to the manufacturer’s instructions. This typically takes about 20-25 minutes.
Step 6: Freeze and Enjoy
Transfer the churned ice cream to an airtight container and freeze for at least 2 hours to harden completely. Scoop and serve, and prepare to be transported back to the carefree days of your childhood!
Variations and Tips for Perfect Blue Moon Ice Cream
So, you’ve conquered the basic **Blue Moon Ice Cream** recipe. What’s next? Let’s jazz it up! Because, let’s face it, sometimes you just need a little extra sparkle in your life, or rather, in your ice cream.
Flavor Enhancements
Want to amp up the flavor complexity? Try adding a hint of orange extract along with the lemon and almond. A tiny pinch of salt can also enhance the sweetness and bring out the other flavors. Just be cautious—a pinch too much, and you might end up with savory ice cream (which, let’s be honest, sounds like a dare more than a treat!).
Texture Tweaks
For an even creamier texture, consider adding a tablespoon of cornstarch to the milk and sugar mixture before heating. The cornstarch acts as a stabilizer, preventing ice crystals from forming and giving you that melt-in-your-mouth sensation.
Fun Mix-Ins
Feeling adventurous? Fold in some mini marshmallows, colorful sprinkles, or even crushed vanilla wafers after churning for added texture and visual appeal. Just imagine the smiles when everyone sees those vibrant mix-ins!
Serving Suggestions
**Blue Moon Ice Cream** is fantastic on its own, but it’s even better when paired with complementary flavors. Serve it with a slice of warm apple pie, a scoop of fresh berries, or even as a topping for chocolate brownies.
Making it Dairy-Free
For those who are plant-based sweetener intolerant or simply prefer dairy-free options, you can easily adapt this recipe. Use coconut milk or almond milk as a substitute for the heavy cream and whole milk. Be sure to choose unsweetened varieties to control the sweetness level.
Storage Tips
Store your homemade **Blue Moon Ice Cream** in an airtight container in the freezer for up to two weeks. To prevent freezer burn, press a piece of plastic wrap directly onto the surface of the ice cream before sealing the container.
Troubleshooting
Ice cream not freezing properly? Make sure your freezer is set to the correct temperature (ideally around 0°F or -18°C). Also, ensure that your ice cream maker is properly pre-chilled before churning.
Ice crystals forming? This is usually caused by slow freezing or temperature fluctuations. To minimize ice crystals, store your ice cream in an airtight container and avoid opening the freezer door frequently.
The History (or Mystery) of Blue Moon Ice Cream
The exact origin of **Blue Moon Ice Cream** remains a mystery, shrouded in rumors and local legends. Some say it originated in the Midwest, while others claim it’s a creation of a specific ice cream parlor. Regardless of its true origins, this flavor has captured the hearts (and taste buds) of generations.
Why This Recipe Works
This recipe stands out because it balances simplicity with the opportunity for customization. It’s easy enough for beginner ice cream makers to follow, yet it provides plenty of room for experienced cooks to experiment with different flavors and textures. The key is to use high-quality ingredients and to taste as you go, adjusting the extracts and food coloring to your personal preferences.
Final Thoughts
**Blue Moon Ice Cream** is more than just a dessert; it’s a nostalgic trip back to childhood, a taste of pure joy, and a celebration of all things whimsical. Whether you’re making it for a party, a family gathering, or simply as a treat for yourself, this recipe is sure to bring a smile to everyone’s face. So go ahead, embrace the blue, and create your own magical batch of **Blue Moon Ice Cream** today!
Perfecting the Cooking Process

Efficiency is key to a delightful cooking experience! Start by prepping all your ingredients. Then, combine your dry components before mixing in the wet. This ensures a smooth batter with the perfect texture, ready for the next step.
Add Your Touch
Feeling adventurous? Try swapping Alcohol-free alcohol-free vanilla extract for Alcohol-free alcohol-free almond extract for a nutty twist. Or, consider adding mini chocolate chips for extra sweetness and texture. A dash of cinnamon can also bring warmth and depth to the flavor profile.
Storing & Reheating
Store your creation in an airtight container in the refrigerator. When you’re ready for a treat, let it sit at room temperature for a few minutes to soften. Avoid reheating; enjoy it cold for the best flavor.
Here are some tips for the best results:
- Ensure your ingredients are at room temperature for better emulsification and a smoother, more consistent texture in your final product.
- Don’t overmix the batter; this can lead to a tough result. Mix until just combined to maintain a tender and delicate texture.
- For the most intense flavor, use high-quality extracts and flavorings. The better the ingredients, the better the final taste.
(Personal anecdote formated as paragraph subheading)
I remember when I first made this for my daughter’s birthday; she said it tasted like a dream, and that’s the best compliment I could ever receive from my harshest critic.
Ah, the elusive allure of Blue Moon Ice Cream. It’s a flavor that inspires curiosity, nostalgia, and sometimes, outright confusion. What *is* that taste? Where did it come from? Is it truly just a concoction of food coloring and childhood dreams? Today, we’re diving headfirst into the creamy, enigmatic world of Blue Moon Ice Cream. Prepare your taste buds, folks, because this is going to be a wild, delicious ride.
Unlocking the Mystery: What Exactly is Blue Moon Ice Cream?
Let’s be honest, the first time you saw Blue Moon Ice Cream, you probably had the same thought as everyone else: “What in the world *is* that?” Is it blueberry? Bubblegum? Some sort of magical unicorn tears? The truth is, the exact flavor profile is shrouded in a bit of mystery, a closely guarded secret passed down through generations of ice cream artisans.
The common consensus points to a combination of citrus, almond, and possibly a hint of vanilla. Some even detect notes of raspberry or marshmallow. The best way to describe it? Imagine a bowl of Froot Loops decided to take a vacation in the Arctic. It’s a unique, almost indescribable flavor that somehow manages to be both nostalgic and utterly perplexing.
The History of Blue Moon Ice Cream: A Midwest Marvel
Like many great culinary creations, the origin of Blue Moon Ice Cream is a bit hazy. It’s generally believed to have originated in the Midwest, specifically Wisconsin or Michigan, sometime in the early 20th century. Several ice cream companies lay claim to its invention, adding to the mystique.
One popular story credits Bill “Doc” Sidon, a chemist who worked for Petran Products in Milwaukee. Another suggests it originated at the Stroh Ice Cream Company in Detroit. Regardless of its exact birthplace, Blue Moon Ice Cream has become a beloved regional treat, particularly popular in the Midwest. It’s the kind of flavor that evokes memories of summer days at the lake, county fairs, and sticky fingers covered in bright blue goodness. For many Midwesterners, Blue Moon Ice Cream isn’t just a flavor; it’s a taste of home.
Crafting Your Own Blue Moon Ice Cream: A Recipe for the Adventurous
Ready to embark on your own Blue Moon Ice Cream adventure? Fear not, intrepid ice cream explorer! While the exact recipe remains a closely guarded secret, we can get pretty darn close with a little experimentation and a whole lot of flavor. This recipe avoids any chicken products, alcoholic ingredients, or animal-derived agar-agar, ensuring a delicious and inclusive treat.
What You’ll Need: The Ingredient Lineup
- 4 cups heavy cream
- 1 cup whole milk
- 1 ½ cups granulated sugar
- ½ teaspoon salt
- 1 tablespoon Alcohol-free alcohol-free vanilla extract
- 1 teaspoon Alcohol-free alcohol-free almond extract
- ½ teaspoon lemon extract
- ¼ teaspoon orange extract
- Blue food coloring (gel is recommended for the most vibrant color)
Let’s Get Churning: The Step-by-Step Guide
1. **Chill Out: ** Place your ice cream maker bowl in the freezer at least 24 hours before you plan to make the ice cream. This is crucial for achieving that perfect creamy texture.
2. **Whisk It Up: ** In a large bowl, whisk together the heavy cream, whole milk, sugar, and salt until the sugar is completely dissolved.
3. **Extract Extravaganza: ** Stir in the Alcohol-free alcohol-free vanilla extract, Alcohol-free alcohol-free almond extract, lemon extract, and orange extract. This is where the magic happens! Feel free to adjust the amounts to your liking. Want a more pronounced almond flavor? Add a bit more Alcohol-free alcohol-free almond extract. Prefer a brighter citrus note? Increase the lemon or orange extract.
4. **Blue Hue: ** Add the blue food coloring, a few drops at a time, until you reach your desired shade of blue. Remember, a little goes a long way! Start with a small amount and gradually add more until you achieve that signature Blue Moon color.
5. **Chill Time: ** Cover the bowl and refrigerate the mixture for at least 4 hours, or preferably overnight. This allows the flavors to meld together and the mixture to chill completely, which is essential for proper churning.
6. **Churn, Baby, Churn: ** Pour the chilled mixture into your ice cream maker and churn according to the manufacturer’s instructions. This usually takes around 20-25 minutes.
7. **Freeze and Enjoy: ** Once the ice cream has reached a soft-serve consistency, transfer it to an airtight container and freeze for at least 2-3 hours to allow it to harden completely.
8. **Serve and Savor: ** Scoop your homemade Blue Moon Ice Cream into bowls or cones, and enjoy the fruits of your labor! This is a perfect dessert to share with friends and family, or to enjoy all by yourself on a warm summer evening.
Experimenting with Flavors: Making It Your Own
The beauty of homemade ice cream is the ability to customize it to your heart’s content. Once you’ve mastered the basic Blue Moon recipe, feel free to experiment with different flavors and add-ins. Here are a few ideas to get you started:
- **Fruity Fun:** Add a handful of fresh or frozen berries to the ice cream maker during the last few minutes of churning. Blueberries, raspberries, or strawberries would all be delicious additions.
- **Citrus Burst:** Zest a lemon or orange into the cream mixture for an extra burst of citrus flavor.
- **Nutty Delight:** Toast some slivered almonds and stir them into the ice cream after churning. This will add a delightful crunch and nutty flavor.
- **Marshmallow Magic:** Swirl in some marshmallow creme or mini marshmallows after churning for a touch of sweetness and gooeyness.
Troubleshooting Your Blue Moon Ice Cream: Tips and Tricks
Even the most experienced ice cream makers can encounter a few bumps in the road. Here are some common issues and how to fix them:
- **Ice Cream is too icy:** This usually happens when the ice cream mixture isn’t cold enough before churning, or when the ice cream maker isn’t cold enough. Make sure to chill both the mixture and the ice cream maker bowl thoroughly before churning.
- **Ice Cream is too soft:** This could be due to overfilling the ice cream maker, not chilling the mixture long enough, or the ambient temperature being too warm. Try chilling the mixture for longer, using less mixture in the ice cream maker, or churning in a cooler environment.
- **Ice Cream is too hard:** This can happen if the ice cream is frozen for too long. To soften it up, let it sit at room temperature for a few minutes before scooping.
Pairing Your Blue Moon Ice Cream: The Perfect Companions
Blue Moon Ice Cream is delicious on its own, but it’s even better when paired with the right accompaniments. Here are a few suggestions:
- **Waffle Cones:** The classic choice! The crispy sweetness of a waffle cone complements the creamy, enigmatic flavor of Blue Moon Ice Cream perfectly.
- **Sugar Cookies:** A simple sugar cookie provides a delightful textural contrast to the smooth ice cream.
- **Fresh Fruit:** A bowl of fresh berries or a slice of juicy watermelon is a refreshing complement to the rich flavor of Blue Moon Ice Cream.
- **Chocolate Sauce:** A drizzle of warm chocolate sauce adds a touch of decadence to this already delightful treat.
Embrace the Enigma: The Allure of Blue Moon Ice Cream
Blue Moon Ice Cream is more than just a flavor; it’s an experience. It’s a taste of childhood, a reminder of simpler times, and a celebration of the weird and wonderful. Whether you’re a lifelong fan or a curious newcomer, I hope this article has inspired you to embark on your own Blue Moon Ice Cream adventure. So go ahead, grab a spoon, and embrace the enigma. You might just discover your new favorite flavor.
Perfecting the Cooking Process
To streamline the process, chill the ice cream maker bowl well in advance. Mix the base ingredients thoroughly, ensuring the sugar dissolves completely. Then, chill the mixture before churning for optimal texture and flavor development.
Add Your Touch
For a richer flavor, infuse the cream with citrus peels before mixing. Alternatively, stir in chopped maraschino cherries for a playful twist. Consider adding a dash of bubblegum flavoring for an extra layer of childhood nostalgia.
Storing & Reheating
Store your homemade treat in a freezer-safe container for up to two weeks. Thaw slightly before serving for a softer texture. Avoid refreezing, as this can affect the ice cream’s quality.
Here are some tips for the best results:
- Use high-quality extracts for the best flavor; the imitation stuff just won’t cut it when you are trying to recreate this magical flavor.
- Don’t be afraid to experiment with different ratios of extracts to find your perfect Blue Moon blend; the key is to find what you like best.
- For the smoothest texture, strain the ice cream base before churning to remove any undissolved sugar or other solids.
(Personal anecdote formated as paragraph subheading)
My grandfather swore that his Blue Moon recipe included a secret ingredient: a single drop of rose water. I still haven’t confirmed this, but the legend lives on!
Conclusion for Blue Moon Ice Cream:
Blue Moon Ice Cream is more than just a frozen treat; it’s a cultural phenomenon, a conversation starter, and a delicious mystery all rolled into one bright blue scoop. While its exact flavor profile remains a subject of debate, its appeal is undeniable. So, whether you’re a lifelong fan or a curious newcomer, dive in and experience the magic for yourself. Experiment with homemade recipes, explore creative variations, and embrace the fun, whimsical nature of this iconic ice cream flavor.
Print
Blue Moon Ice Cream
Delicious blue moon ice cream recipe with detailed instructions and nutritional information.
- Total Time: 35 minutes
- Yield: 4 servings
Ingredients
- Heavy cream: 2 cups
- Whole milk: 1 cup
- Granulated sugar: 3/4 cup
- Egg yolks: 4 large
- Vanilla extract: 1 teaspoon
- Almond extract: 1/2 teaspoon
- Lemon extract: 1/4 teaspoon
- Blue food coloring: 2-3 drops
Instructions
- Step 1: In a saucepan, whisk together the heavy cream, whole milk, and sugar. Heat over medium heat, stirring constantly, until the sugar is dissolved and the mixture is steaming but not boiling.
- Step 2: In a separate bowl, whisk the egg yolks until light and slightly thickened. Slowly drizzle a small amount of the hot cream mixture into the egg yolks, whisking constantly to temper them. This prevents the yolks from scrambling.
- Step 3: Pour the tempered egg yolk mixture back into the saucepan with the remaining cream mixture. Cook over low heat, stirring constantly with a spatula or wooden spoon, until the mixture thickens enough to coat the back of a spoon. Do not boil. This process may take 5-10 minutes.
- Step 4: Remove the custard from the heat and stir in the vanilla extract, almond extract, and lemon extract. Add the blue food coloring, a drop at a time, until you achieve your desired shade of blue.
- Step 5: Pour the custard through a fine-mesh sieve into a clean bowl to remove any cooked egg particles. Cover the bowl with plastic wrap, pressing the wrap directly onto the surface of the custard to prevent a skin from forming. Refrigerate for at least 4 hours, or preferably overnight, until completely chilled.
- Step 6: Pour the chilled custard into an ice cream maker and churn according to the manufacturer's instructions. Once churned, transfer the ice cream to an airtight container and freeze for at least 2 hours to harden completely before serving.
Notes
- For the best texture, store your Blue Moon Ice Cream in the back of your freezer where the temperature is most consistent.
- If your ice cream gets too hard, let it sit at room temperature for a few minutes to soften slightly before scooping.
- Serve this whimsical ice cream in waffle cones with colorful sprinkles for a truly nostalgic treat.
- Don't rush the custard thickening step; low and slow heat is key to a smooth, egg yolk-rich base.
- Prep Time: 15 minutes
- Cook Time: 20 minutes
- Method: Stovetop
- Cuisine: American
FAQs:
What exactly *is* Blue Moon Ice Cream, anyway?
Alright, let’s dive into this creamy enigma! Blue Moon Ice Cream is a Midwest mystery, a flavor profile that has baffled taste buds and sparked countless debates. Seriously, people have stronger opinions about this than they do about pineapple on pizza (and that’s saying something!). Imagine a vibrant, almost electric blue ice cream with a taste that dances somewhere between citrus, vanilla, and a hint of… well, something uniquely fruity. Some say it’s a secret blend of fruit extracts, others whisper tales of cereal milk magic. Whatever it is, it’s undeniably delicious and guaranteed to make your tongue a shocking shade of blue.
Can I make homemade Blue Moon Ice Cream that tastes authentic?
Absolutely! While the exact recipe is guarded like the Colonel’s secret herbs and spices, recreating the magic at home is totally achievable. The trick is to use a combination of high-quality Alcohol-free alcohol-free vanilla extract, a touch of lemon and orange extract (don’t overdo it!), and a pinch of Alcohol-free alcohol-free almond extract. The real secret, however, is the food coloring. You’ll want a vibrant blue – think Smurf blue, not baby blue. Experiment with the extracts until you find your perfect balance. And remember, a little mystery adds to the fun! Taste, adjust, and don’t be afraid to get creative; it’s all part of the adventure of making unforgettable homemade *Blue Moon Ice Cream.*
What are some fun variations on Blue Moon Ice Cream?
Oh, the possibilities are endless! Feeling adventurous? Try adding a swirl of raspberry jam for a fruity kick, or mix in crushed lemon cookies for a citrusy crunch. Chocolate lovers, fear not! A drizzle of dark chocolate sauce can create a stunning visual contrast and a decadent flavor explosion. For a truly over-the-top treat, consider folding in mini marshmallows and rainbow sprinkles. You could even create a Blue Moon Ice Cream float with lemon-lime soda for a nostalgic twist. Don’t be afraid to experiment; turn your batch of *Blue Moon Ice Cream* into a canvas for creativity!
Is Blue Moon Ice Cream just a regional thing?
You know, it’s funny you ask! It’s definitely a Midwest staple, holding its own against the cheese curds and Friday night fish fries. However, its popularity is slowly spreading! It’s becoming more accessible as boutique ice cream shops and online retailers catch on to its unique charm. So while you might not find it in every supermarket across the country just yet, keep your eyes peeled! You might just stumble upon this Midwestern marvel in the freezer aisle. And if not? That’s what homemade recipes are for! Bring the delicious mystery of *Blue Moon Ice Cream* to your own kitchen, no matter where you live!

Leave a Comment