


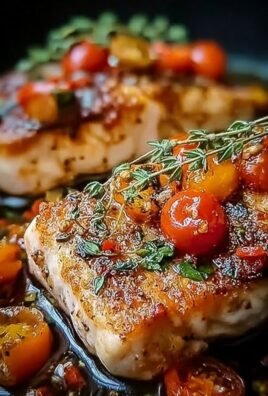
Picture this: a symphony of crispy chicken, fluffy rice, and tangy-sweet sauce all mingling in a bowl. Japanese Katsu Bowls with Tonkatsu Sauce aren’t just a meal; they’re a culinary hug, a comforting explosion of flavor that’ll have you saying “oishii!” before you know it.
I still remember my first encounter with katsu – a rainy day in Tokyo, the warm, savory aroma pulling me into a tiny restaurant where I experienced pure, unadulterated food bliss. These bowls are the perfect way to bring that experience into your own kitchen any day of the week. Get ready for a flavor-packed journey.
Here’s why you’ll absolutely adore these Japanese Katsu Bowls with Tonkatsu Sauce:
- The crispy, golden-brown chicken cutlet offers a satisfying crunch that beautifully contrasts with the soft rice and sauce.
- The homemade Tonkatsu sauce delivers a perfect blend of sweet, savory, and tangy flavors that elevates the entire dish.
- These bowls are surprisingly easy to assemble, making them ideal for busy weeknights when you need a delicious and quick meal.
- You can customize your bowl with various toppings like shredded cabbage, green onions, or a soft-boiled egg for added flair.
Ingredients for Japanese Katsu Bowls with Tonkatsu Sauce
Here’s what you’ll need to make this delicious dish:
The full ingredients list, including measurements, is provided in the recipe card directly below.
How to Make Japanese Katsu Bowls with Tonkatsu Sauce
Follow these simple steps to prepare this delicious dish:
Step 1: Prepare the Chicken Cutlets
Pound the chicken breasts to about 1/2 inch thickness. Set up your breading station: flour in one shallow dish, beaten eggs in another, and panko breadcrumbs in a third. Dredge each cutlet in flour, then dip in egg, and finally coat thoroughly with panko.
Step 2: Cook the Chicken
Heat about 1/2 inch of vegetable oil in a large skillet over medium-high heat. Carefully place the breaded chicken cutlets in the hot oil, ensuring not to overcrowd the pan. Cook for about 3-4 minutes per side, until golden brown and cooked through. Use a thermometer to make sure the internal temperature reaches 165°F (74°C). Place on paper towel to absorb the oil.
Step 3: Make the Tonkatsu Sauce
In a small saucepan, combine ketchup, Worcestershire sauce, soy sauce, apple cider vinegar, brown sugar, and Dijon mustard. Cook over medium heat, stirring constantly, until the sauce thickens slightly, about 5-7 minutes. Adjust the sweetness or tanginess to taste.
Step 4: Assemble the Bowls
Place a generous serving of cooked rice in each bowl. Slice the cooked chicken cutlets into strips and arrange them on top of the rice.
Step 5: Drizzle and Serve
Drizzle the homemade Tonkatsu sauce generously over the chicken and rice.
Step 6: Garnish (Optional)
Add your favorite toppings such as shredded cabbage, sliced green onions, or a sprinkle of sesame seeds. Serve immediately and enjoy your amazing Japanese Katsu Bowls with Tonkatsu Sauce!
Perfecting the Cooking Process

To achieve Katsu perfection, prep your ingredients first. Start with the chicken or beef, then get your rice cooking. While the rice is going, dive into the Tonkatsu sauce. This way, everything comes together harmoniously for a delightful meal.
Add Your Touch
Feel like switching things up? Try using butternut squash or eggplant instead of chicken or beef. A dash of smoked paprika in the breadcrumbs adds a smoky depth. For a spicier kick, mix some sriracha mayo with the Tonkatsu sauce.
Storing & Reheating
Store leftover Katsu separately from the rice to prevent sogginess. Keep the sauce in a sealed container. To reheat, bake the Katsu in a preheated oven until crispy. Warm the rice and sauce separately, then assemble your bowl!
Here are some tips to elevate your Japanese Katsu Bowls with Tonkatsu Sauce:
- Ensure your chicken or beef cutlets are evenly pounded to guarantee uniform cooking and prevent any tough spots in your Katsu.
- Fry the Katsu at the right oil temperature, around 350°F (175°C), to achieve a golden-brown crust without overcooking the inside.
- Let the fried Katsu rest on a wire rack after cooking to maintain its crispiness by allowing excess oil to drip off.
(Personal anecdote formated as paragraph subheading)
My friend once said my Katsu bowls were better than any restaurant’s! That compliment, along with a shared laugh, made all the effort worthwhile and inspired me to share this recipe.
Understanding Japanese Katsu Bowls with Tonkatsu Sauce
Let’s talk about Japanese Katsu Bowls with Tonkatsu Sauce. This dish is more than just fried cutlets and rice; it’s an experience. The crispy, golden-brown Katsu, the fluffy rice, and the savory-sweet Tonkatsu sauce create a symphony of flavors and textures that dance on your taste buds. It’s comfort food elevated, a simple yet satisfying meal that’s perfect for a weeknight dinner or a weekend treat.
But what makes this dish so special? Is it the perfectly crisp breading? The tender, juicy meat? Or perhaps it’s the umami-rich Tonkatsu sauce that ties it all together? Honestly, it’s the sum of all these parts. This recipe aims to demystify the process and show you that creating restaurant-quality Japanese Katsu Bowls with Tonkatsu Sauce at home is not only achievable but also incredibly fun.
Why You’ll Love This Recipe
First off, let’s be real, who doesn’t love fried food? But this isn’t just any fried food; it’s Katsu. The breading is light, the meat is tender, and it’s served on a bed of comforting rice. Plus, the Tonkatsu sauce is like a magic elixir, adding a burst of flavor that complements everything perfectly.
Secondly, this recipe is surprisingly versatile. Feel free to swap out the protein for your favorite – chicken, beef, or even tofu for a vegetarian option. And don’t even get me started on the toppings! A sprinkle of sesame seeds, a drizzle of spicy mayo, or a handful of shredded cabbage can take your bowl to the next level.
Finally, it’s a crowd-pleaser. Whether you’re cooking for your family or hosting a dinner party, Japanese Katsu Bowls with Tonkatsu Sauce are guaranteed to be a hit. They’re easy to customize, so everyone can create their perfect bowl.
Brief History of Katsu
Now, let’s take a quick trip down memory lane. Katsu, short for Katsuretsu, has its roots in late 19th-century Japan during the Meiji Restoration, when Western cuisine started influencing Japanese cooking. Initially, it was inspired by European cutlets, but the Japanese adapted it to their own tastes using panko breadcrumbs and a unique blend of spices.
Tonkatsu, specifically, gained popularity in the early 20th century. It was originally made with chicken, but today you can find variations using chicken (chicken katsu) or beef (gyukatsu). Over time, it evolved into a beloved staple, enjoyed in restaurants and homes across Japan and around the world. The dish’s journey from a Western-inspired novelty to a cherished comfort food speaks volumes about its universal appeal.
Gathering Your Ingredients for the Perfect Japanese Katsu Bowls with Tonkatsu Sauce
Alright, let’s get down to business. To make the best Japanese Katsu Bowls with Tonkatsu Sauce, you’ll need a few key ingredients. Don’t worry, most of them are easy to find at your local grocery store. The freshness and quality of your ingredients will directly impact the flavor of your dish, so choose wisely.
The Katsu Component
- **Chicken or Beef Cutlets:** Opt for boneless, skinless chicken breasts or thinly sliced beef sirloin. Pounding them to an even thickness ensures they cook evenly. I usually go for chicken because it’s versatile and always a hit.
- **All-Purpose Flour:** This helps the egg mixture adhere to the meat, creating a better base for the breadcrumbs.
- **Eggs:** These add richness and help the panko breadcrumbs stick to the cutlets.
- **Panko Breadcrumbs:** These Japanese breadcrumbs are coarser than regular breadcrumbs, giving the Katsu its signature crispy texture. Trust me, don’t skimp on this.
- **Vegetable Oil:** For frying. Make sure you have enough to fully submerge the cutlets.
The Tonkatsu Sauce Component
- **Ketchup:** Adds sweetness and a classic tomato base.
- **Worcestershire Sauce (Vegan):** Adds depth and umami flavor. Be sure to choose a brand that doesn’t contain anchovies to keep it animal-free.
- **Soy Sauce:** For saltiness and umami.
- **Apple Cider Vinegar:** Adds a tangy counterpoint to the sweetness.
- **Brown Sugar:** For a touch of caramel-like sweetness.
- **Ginger (Grated):** Adds warmth and a subtle spice.
The Bowl Essentials
- **Cooked Rice:** Japanese short-grain rice is ideal, but any rice will do in a pinch.
- **Shredded Cabbage:** Adds a refreshing crunch and balances the richness of the Katsu.
- **Sesame Seeds (Optional):** For garnish and a nutty flavor.
- **Green Onions (Optional):** For a fresh, mild onion flavor and visual appeal.
Ingredient Substitutions and Tips
Don’t have panko breadcrumbs? Regular breadcrumbs will work, but they won’t be quite as crispy. Consider toasting them lightly before using. Running low on apple cider vinegar? Rice vinegar is a great alternative. If you can’t find vegan Worcestershire sauce, try using a combination of soy sauce and a splash of balsamic vinegar. Feel free to experiment with other veggies in your bowl, such as sliced cucumbers or carrots.
Step-by-Step Guide to Making Japanese Katsu Bowls with Tonkatsu Sauce
Okay, here’s where the magic happens. Follow these steps, and you’ll be enjoying your own delicious Japanese Katsu Bowls with Tonkatsu Sauce in no time. Don’t be intimidated; it’s easier than it looks.
Preparing the Chicken or Beef
1. **Pound the Cutlets: ** Place your chicken or beef cutlets between two sheets of plastic wrap. Use a meat mallet or rolling pin to pound them to an even 1/4-inch thickness. This ensures they cook evenly and stay tender.
2. **Season: ** Lightly season the cutlets with salt and pepper.
Setting Up the Breading Station
1. **Flour: ** Place the all-purpose flour in a shallow dish.
2. **Eggs: ** In another shallow dish, whisk the eggs until smooth.
3. **Panko: ** Place the panko breadcrumbs in a third shallow dish.
Breading the Cutlets
1. **Dredge: ** Dredge each cutlet in the flour, shaking off any excess.
2. **Dip: ** Dip the floured cutlet in the egg mixture, making sure it’s fully coated.
3. **Coat: ** Press the egg-covered cutlet into the panko breadcrumbs, ensuring it’s completely coated. Repeat for all cutlets.
Making the Tonkatsu Sauce
1. **Combine: ** In a small saucepan, combine the ketchup, vegan Worcestershire sauce, soy sauce, apple cider vinegar, brown sugar, and grated ginger.
2. **Simmer: ** Bring the mixture to a simmer over medium heat. Cook for about 5-7 minutes, stirring occasionally, until the sauce has thickened slightly.
3. **Taste: ** Taste the sauce and adjust the seasonings as needed. Add more brown sugar for sweetness or apple cider vinegar for tanginess.
Frying the Katsu
1. **Heat the Oil: ** Pour enough vegetable oil into a large skillet or pot so that it’s about 1 inch deep. Heat the oil over medium-high heat until it reaches 350°F (175°C). If you don’t have a thermometer, test the oil by dropping a breadcrumb into it; it should sizzle and turn golden brown in about 30 seconds.
2. **Fry: ** Carefully place the breaded cutlets into the hot oil, being careful not to overcrowd the pan. Fry for about 3-4 minutes per side, until they are golden brown and cooked through.
3. **Drain: ** Remove the fried cutlets from the oil and place them on a wire rack to drain excess oil.
Assembling the Katsu Bowls
1. **Rice: ** Place a generous scoop of cooked rice in a bowl.
2. **Katsu: ** Slice the Katsu into strips and arrange them on top of the rice.
3. **Cabbage: ** Add a handful of shredded cabbage next to the Katsu.
4. **Sauce: ** Drizzle generously with Tonkatsu sauce.
5. **Garnish: ** Sprinkle with sesame seeds and green onions, if desired.
Serving Suggestions
Japanese Katsu Bowls with Tonkatsu Sauce are a complete meal on their own, but if you want to round things out, here are a few serving suggestions:
- **Miso Soup:** A classic Japanese side dish that adds warmth and umami.
- **Edamame:** Steamed edamame sprinkled with salt is a simple and healthy addition.
- **Japanese Pickles (Tsukemono):** Adds a tangy and crunchy element.
- **Side Salad with Ginger Dressing:** A light and refreshing salad to balance the richness of the Katsu.
Troubleshooting Tips
- **Katsu Not Crispy Enough:** Make sure your oil is hot enough and don’t overcrowd the pan. Also, avoid moving the cutlets around too much while they’re frying.
- **Katsu Overcooked:** Reduce the heat and cook for a shorter amount of time. Pounding the cutlets to an even thickness helps prevent uneven cooking.
- **Sauce Too Thick:** Add a tablespoon or two of water to thin it out.
- **Sauce Too Thin:** Simmer for a few more minutes to reduce it.
Nutritional Information (Approximate)
- Calories: 600-800 per serving (depending on portion size and ingredients)
- Protein: 30-40g
- Carbohydrates: 60-80g
- Fat: 20-30g
Remember, these are just estimates. The actual nutritional content will vary based on the specific ingredients you use and your portion sizes.
I hope you enjoy this recipe for Japanese Katsu Bowls with Tonkatsu Sauce! It’s a dish that’s close to my heart, and I’m excited for you to try it. Happy cooking!
Conclusion for Japanese Katsu Bowls with Tonkatsu Sauce :
These **Japanese Katsu Bowls with Tonkatsu Sauce** are a simple, flavorful, and customizable meal that’s perfect for any night of the week. You learned how to make the crispy Katsu, create a vibrant bowl with fresh veggies, and whip up that irresistible Tonkatsu sauce. Don’t be afraid to experiment with different proteins or vegetables to personalize your bowls. So go ahead, impress your family and friends with your newfound Katsu skills! It’s time to get cooking and enjoy a taste of Japan right in your own kitchen.
Print
Japanese Katsu Bowls with Tonkatsu Sauce
Delicious japanese katsu bowls with tonkatsu sauce recipe with detailed instructions and nutritional information.
- Total Time: 35 minutes
- Yield: 4 servings 1x
Ingredients
- Boneless pork chops (1/2 inch thick) 2
- All-purpose flour 1/2 cup
- Panko bread crumbs 1 1/2 cups
- Eggs 2 large
- Cooked white rice 2 cups
- Cabbage (shredded) 1 cup
- Tonkatsu sauce 1/2 cup
- Vegetable oil for frying
Instructions
- Step 1: Prepare the pork chops by pounding them to an even thickness (about 1/4 inch). Season generously with salt and pepper.
- Step 2: Set up a breading station: one bowl with flour, one with beaten eggs, and one with panko bread crumbs. Dredge each pork chop in flour, then dip in the egg, and finally coat thoroughly with panko bread crumbs.
- Step 3: Heat vegetable oil in a large skillet over medium-high heat. The oil should be deep enough to come halfway up the sides of the pork chops.
- Step 4: Fry the pork chops for 3-4 minutes per side, or until golden brown and cooked through. Remove from skillet and place on a wire rack to drain excess oil.
- Step 5: Slice the katsu into strips.
- Step 6: Assemble the bowls: Place a portion of rice in each bowl, top with shredded cabbage, sliced katsu, and drizzle generously with tonkatsu sauce.
Notes
- Store leftover katsu separately from the rice and cabbage to prevent sogginess, ideally in an airtight container in the refrigerator.
- For the crispiest reheated katsu, use an air fryer or bake in a preheated oven at 350°F (175°C) for a few minutes.
- Try adding a sprinkle of toasted sesame seeds or a drizzle of Japanese mayo to each bowl for extra flavor and visual appeal.
- Pounding the pork to an even thickness is key for even cooking and prevents some parts from drying out while others remain undercooked.
- Prep Time: 15 minutes
- Cook Time: 20 minutes
- Method: Stovetop
- Cuisine: American
FAQs :
What exactly is Katsu, and why should I be excited?
Katsu, my friend, is essentially a perfectly golden-fried cutlet of deliciousness! Think of it as the ultimate crispy comfort food. Usually, people make it using chicken, but this recipe opts for chicken or turkey for a lighter, equally satisfying experience. Honestly, the crunch combined with the savory Tonkatsu sauce will make your taste buds sing. You should be excited because it’s surprisingly easy to make at home and way better than takeout (plus, you get to control the ingredients!). It’s a culinary adventure that ends with a happy belly.
Can I make the Tonkatsu sauce ahead of time?
Absolutely! In fact, I encourage it. The **Tonkatsu sauce** actually tastes better after the flavors have had a chance to meld together in the fridge. You can whip up a batch of this tangy, sweet, and savory elixir up to a week in advance and store it in an airtight container. This makes assembling your **Japanese Katsu Bowls with Tonkatsu Sauce** a breeze on busy weeknights. Just imagine coming home to perfectly prepped sauce – pure bliss! It’s like giving your future self a high-five for being so organized.
What’s the best way to get the Katsu extra crispy?
Ah, the secret to Katsu perfection! Firstly, ensure your oil is hot enough – around 350°F (175°C) is ideal. Secondly, don’t overcrowd the pan! Frying too many cutlets at once will lower the oil temperature and result in soggy Katsu. Pat the chicken or turkey cutlets dry before breading them. Finally, a double dip in the breadcrumbs is key! The extra coating creates a shield of crunch that will withstand the frying process. Follow these tips, and you’ll be crunching your way to Katsu heaven.
Can I use different vegetables in my Japanese Katsu Bowls with Tonkatsu Sauce?
Of course! Feel free to get creative with your veggies. While this recipe suggests cabbage, carrots, and scallions, you can easily swap them out for other favorites. Shredded lettuce, cucumbers, or even some blanched green beans would be fantastic additions. The beauty of these **Japanese Katsu Bowls with Tonkatsu Sauce** is their versatility. They’re a blank canvas for your culinary imagination. Don’t be afraid to experiment and find your perfect veggie combination. Think of it as your personal Katsu masterpiece!

Leave a Comment