

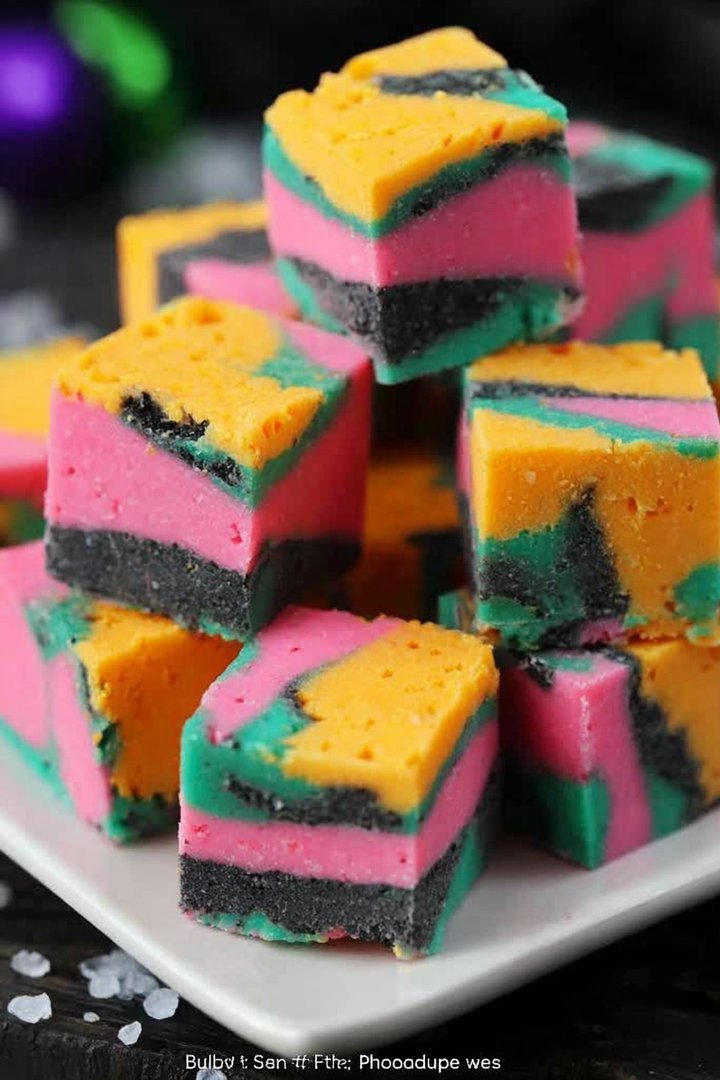
Imagine biting into a square of pure delight: creamy, dreamy, Sally Skellington Fudge that melts in your mouth. This isn’t just any fudge; it’s a ghostly good treat, a sweet symphony that will dance on your taste buds and leave you craving more.
This Sally Skellington Fudge recipe evokes memories of cozy autumn nights, crackling fires, and the delightful thrill of Autumn celebration. Each bite is a celebration, a simple joy that brings a touch of magic to any occasion, and it will take less than 30 minutes to make!
- Effortlessly create a stunning dessert that’s perfect for parties, gifts, or a spooky movie night.
- The unique blend of white chocolate and vanilla creates a flavor profile that’s both comforting and exciting.
- The contrasting colors and simple design make this fudge visually striking and instantly recognizable.
- Adaptable for various dietary needs and preferences, this recipe is a blank canvas for your creativity.
Ingredients for Sally Skellington Fudge
Here’s what you’ll need to make this delicious dish:
The full ingredients list, including measurements, is provided in the recipe card directly below.
How to Make Sally Skellington Fudge
Follow these simple steps to prepare this delicious dish:
Step 1: Prepare Your Canvas
Line an 8×8 inch baking pan with parchment paper, leaving an overhang on the sides. This will make it easy to lift the fudge out later. Lightly grease the parchment paper with cooking spray to prevent sticking.
Step 2: Melt the Magic
In a large, microwave-safe bowl, combine the white chocolate chips and sweetened condensed milk. Microwave in 30-second intervals, stirring after each interval, until the chocolate is completely melted and smooth. Be careful not to overheat the chocolate, as it can seize up.
Step 3: Flavor Enhancement
Stir in the Alcohol-free alcohol-free vanilla extract and salt until well combined. This will create a rich and balanced flavor profile for your fudge.
Step 4: Divide and Conquer
Divide the fudge mixture in half. In one bowl, add the black food coloring and stir until the fudge is a consistent dark gray. In the other bowl, leave the fudge white or add a touch of red food coloring for a subtle pink hue, reminiscent of Sally’s patchwork skin.
Step 5: Create Sally’s Face
Pour the white or pink fudge into the prepared pan and spread it evenly. Then, drop small spoonfuls of the black fudge onto the white/pink layer. Use a toothpick or skewer to swirl the black fudge into the white/pink, creating a marbled effect. You can also use the black fudge to create simple facial features like eyes and a stitched mouth, reminiscent of Sally Skellington.
Step 6: Chill Out
Cover the pan with plastic wrap and refrigerate for at least 2 hours, or preferably overnight, until the fudge is firm. Once firm, lift the fudge out of the pan using the parchment paper overhang. Cut into squares and serve.
Transfer to a platter and watch your Sally Skellington Fudge disappear! It’s the perfect treat for Autumn celebration parties, spooky movie nights, or any time you want to add a touch of whimsy to your day.
It all started with a craving, a sugary, spooky craving that only the best fudge could satisfy. I needed a recipe that screamed Autumn celebration Town, but tasted like a dream. Enter Sally Skellington Fudge, a treat so good, it’s scary.
Why Sally Skellington Fudge? Because, Why Not?!
Let’s be honest, store-bought fudge is… well, boring. This Sally Skellington Fudge recipe? It’s an experience. Imagine biting into a creamy, dreamy, melt-in-your-mouth confection that tastes like pure happiness with a touch of whimsical fun. It’s the perfect treat to impress your friends, family, or even that cute ghoul next door. And hey, who doesn’t love a good excuse to indulge in something utterly delicious?
A Love Letter to Nightmare Before Winter holiday (and Your Tastebuds)
This isn’t just any fudge; it’s a tribute to one of the greatest animated movies ever made. The Nightmare Before Winter holiday holds a special place in many hearts, mine included. The quirky characters, the spooky scenery, and the catchy tunes are just pure genius. I wanted to encapsulate that magic in a dessert. Each bite of this fudge is like a little trip to Autumn celebration Town, without the pesky Oogie Boogie.
And the best part? You don’t need to be a culinary expert to whip this up. If I, a person who once set fire to water (don’t ask), can make this, so can you. Seriously, it’s easier than summoning a pumpkin king.
Crafting the Perfect Batch of Sally Skellington Fudge: A Step-by-Step Guide
Okay, let’s get down to brass tacks. Here’s what you’ll need to transform your kitchen into a fudge-making wonderland.
Ingredients: Your Spooky Shopping List
- 3 cups granulated sugar (the foundation of our sugary masterpiece)
- 1 cup (2 sticks) unsalted butter, softened (because everything is better with butter)
- 2/3 cup evaporated milk (for that creamy, dreamy texture)
- 12 oz semi-sweet chocolate chips (the dark side of deliciousness)
- 7 oz marshmallow crème (fluffy clouds of sweetness)
- 1 teaspoon Alcohol-free alcohol-free vanilla extract (a touch of magic)
- 1/2 cup chopped walnuts, pecans, or other nuts (optional, for that extra crunch)
- Sprinkles, candy eyes, or other decorations (because we need to get spooky!)
Equipment: Your Arsenal of Deliciousness
- Large saucepan (your fudge cauldron)
- Wooden spoon (for stirring up trouble… delicious trouble)
- 8×8 inch baking pan (the fudge kingdom)
- Parchment paper (to prevent sticky situations)
- Mixer (optional, but makes life easier)
- Heat-resistant spatula (for getting every last bit)
Instructions: The Fudge-Making Spell
1. **Prepare the Pan: ** Line your 8×8 inch baking pan with parchment paper. This will make removing the fudge a breeze. Trust me, you don’t want to be scraping fudge off a pan at midnight.
2. **Combine and Cook: ** In your large saucepan, combine the sugar, butter, and evaporated milk. Cook over medium heat, stirring constantly, until the mixture comes to a full rolling boil. A rolling boil is when the mixture continues to boil even while you stir.
3. **Boil and Stir: ** Continue boiling for 5 minutes, still stirring constantly. This is crucial for the fudge to set properly. Don’t get distracted by TikTok videos now!
4. **Remove from Heat: ** Take the saucepan off the heat. This is where the magic really happens.
5. **Add the Goodies: ** Stir in the chocolate chips, marshmallow crème, and Alcohol-free alcohol-free vanilla extract. Mix until everything is smooth and melted. If you’re using nuts, add them now too.
6. **Pour and Decorate: ** Pour the fudge mixture into your prepared pan. Spread it out evenly. Now for the fun part: decorate with sprinkles, candy eyes, or whatever spooky embellishments your heart desires! Get creative!
7. **Chill Out: ** Let the fudge cool completely at room temperature. Then, cover it and refrigerate for at least 2 hours, or preferably overnight. Patience, my friend, patience.
8. **Cut and Serve: ** Once the fudge is firm, lift it out of the pan using the parchment paper. Cut it into squares and prepare to be amazed.
Troubleshooting Your Sally Skellington Fudge
Even the best of us have kitchen mishaps. Here are a few common problems and how to fix them.
Fudge is Too Soft
- **Problem:** Didn’t boil long enough.
- **Solution:** Put the fudge back in the saucepan and cook it for a few more minutes, stirring constantly. Then, try chilling it again.
Fudge is Too Grainy
- **Problem:** Sugar crystals formed during cooking.
- **Solution:** Unfortunately, grainy fudge is hard to fix. Next time, make sure to stir constantly and avoid splashing sugar crystals onto the sides of the pan.
Fudge Didn’t Set
- **Problem:** Didn’t use enough sugar or didn’t boil long enough.
- **Solution:** This might be a lost cause. Time to start over. But hey, practice makes perfect!
Variations on a Theme: Sally Skellington Fudge Remixes
Want to get a little wild with your fudge? Here are a few ideas to spice things up:
Peanut Butter Sally Skellington Fudge
Add a cup of peanut butter chips along with the semi-sweet chocolate chips for a Reese’s-esque twist. Prepare for a flavor explosion!
Mint Chocolate Sally Skellington Fudge
Substitute peppermint extract for the vanilla and use Andes mints as a topping. Perfect for the holidays… or any time you need a little minty freshness.
Salted Caramel Sally Skellington Fudge
Swirl in some salted caramel sauce after pouring the fudge into the pan. Sweet, salty, and utterly irresistible.
Perfecting the Cooking Process
For the best Sally Skellington Fudge, gather all your ingredients beforehand. Then, accurately measure them to ensure a successful outcome. Cooking the sugar mixture to the correct temperature is crucial, so use a timer to avoid undercooking it.
Add Your Touch
Feel free to customize this Sally Skellington Fudge recipe. Try different types of chocolate like dark or white. Experiment with various nut combinations. You can also add dried fruits or different types of sprinkles to match your taste.
Storing & Reheating
Store the Sally Skellington Fudge in an airtight container at room temperature for up to a week or in the refrigerator for up to two weeks. If you want to freeze it, wrap it tightly in plastic wrap and then in foil. It will last for up to three months.
- Always use a heavy-bottomed saucepan to prevent scorching the fudge mixture. This helps ensure even cooking and a smooth final product.
- Don’t be afraid to experiment with different extracts. Almond, maple, or even a hint of orange can add a unique twist to your fudge.
- For extra spooky flair, use food coloring to tint your marshmallow crème before adding it to the mixture. A touch of green or purple will make it pop!
(Personal anecdote)
One year, I made this fudge for a Autumn celebration party. It was gone in minutes! People were practically fighting over the last piece. I knew then that this was a recipe worth sharing.
So, there you have it: your guide to making the most spooktacular and delicious Sally Skellington Fudge. Go forth, create, and enjoy! Remember, the most important ingredient is love (and maybe a little bit of sugar). Happy baking!
Conclusion for Sally Skellington Fudge:
This Sally Skellington Fudge recipe is a delightful treat that’s both visually stunning and incredibly delicious. Its simplicity makes it a fantastic option for bakers of all skill levels. With the ability to customize colors and flavors, you can easily adapt it to any occasion. Remember the key is chilling it well for that perfect firm texture. So go ahead, whip up a batch of this spooktacular fudge. Everyone will ask for the recipe!
Print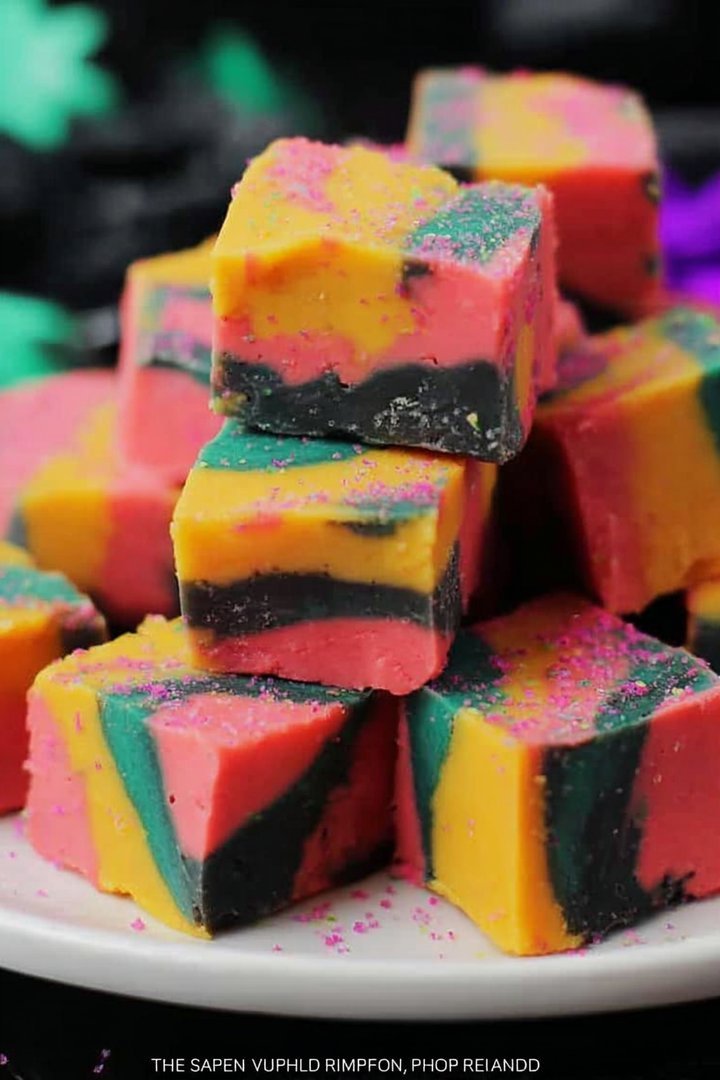
Sally Skellington Fudge
Delicious sally skellington fudge recipe with detailed instructions and nutritional information.
- Total Time: 35 minutes
- Yield: 4 servings
Ingredients
- White chocolate chips: 2 cups
- Sweetened condensed milk: 1 (14 ounce) can
- Vanilla extract: 1 teaspoon
- Marshmallow creme: 7 ounces
- Purple gel food coloring: 2-3 drops
- Black gel food coloring: 2-3 drops
- Sally Skellington Sprinkles or Edible Sugar Flowers: As desired
- Powdered sugar: For dusting
Instructions
- Step 1: Line an 8×8 inch baking pan with parchment paper, leaving an overhang on the sides. This will make it easier to remove the fudge later.
- Step 2: In a large microwave-safe bowl, combine the white chocolate chips and sweetened condensed milk. Microwave in 30-second intervals, stirring after each interval, until the chocolate is completely melted and smooth.
- Step 3: Stir in the vanilla extract and marshmallow creme until fully incorporated. Divide the mixture into two separate bowls.
- Step 4: Add the purple gel food coloring to one bowl and the black gel food coloring to the other, stirring until each bowl of fudge is evenly colored.
- Step 5: Pour the purple fudge into the prepared pan, spreading it into an even layer. Gently dollop spoonfuls of the black fudge over the purple layer and swirl them together using a knife or toothpick to create a marbled effect.
- Step 6: Sprinkle the Sally Skellington sprinkles or edible sugar flowers evenly over the top of the fudge. Lightly dust the top of the fudge with powdered sugar. Refrigerate for at least 2 hours, or until firm. Use the parchment paper overhang to lift the fudge from the pan and cut into squares.
Notes
- Store leftover Sally Skellington Fudge in an airtight container in the refrigerator for up to a week to keep it firm and fresh.
- If you want a softer fudge, microwave individual squares for just a few seconds until slightly warmed, but be careful not to melt it completely.
- Serve this whimsical fudge at a Halloween party or spooky movie night for a delightful and thematic treat.
- For a truly vibrant marbled effect, don't over-swirl the purple and black fudge layers; a few well-placed swirls create a spooktacular look!
- Prep Time: 15 minutes
- Cook Time: 20 minutes
- Method: Stovetop
- Cuisine: American
FAQs:
What makes this Sally Skellington Fudge recipe so special?
Well, aside from the obvious (it’s inspired by the Pumpkin Queen herself!), this recipe is special because it’s deceptively easy. You get a stunningly spooky treat without spending hours toiling away in the kitchen. It’s also perfect for parties or a cozy movie night, a guaranteed crowd-pleaser. The contrasting colors and simple design makes it elegant and fun at the same time. So, if you’re looking to impress with minimal effort, this is your go-to fudge recipe! It is the perfect recipe for a spooky-themed event.
Can I make this fudge ahead of time?
Absolutely! In fact, I encourage it. Fudge needs time to set properly, and letting it chill in the refrigerator overnight is the best way to achieve that perfect, firm texture. Just be sure to wrap it tightly in plastic wrap to prevent it from drying out or absorbing any funky fridge odors. When you’re ready to serve, simply take it out, slice it up, and prepare for the compliments. You can store the fudge in an airtight container in the refrigerator for up to a week or even freeze it for longer storage.
How can I customize my Sally Skellington Fudge?
Get creative! While the black and white swirl is iconic, feel free to experiment with different colors and flavors. You could add a dash of peppermint extract to the white layer for a refreshing twist, or mix in some crushed chocolate cookies to the dark layer for added texture. Consider different extracts like vanilla, almond, or even a touch of orange. If you are feeling super creative, you could try different character designs beyond Sally. The possibilities are endless, so have fun and make it your own!
My fudge is too soft/hard, what did I do wrong?
Fudge consistency is tricky! If your fudge is too soft, it likely didn’t cook long enough. Next time, ensure the mixture reaches the softball stage (235-240°F) on a candy thermometer. If it’s too hard, you probably overcooked it. Overcooked fudge can be grainy and crumbly. Next time, closely monitor the temperature and remove it from the heat as soon as it reaches the correct temperature. Altitude can also affect fudge making, so you might need to adjust cooking times slightly.


Leave a Comment